This is the first time ever in my whole life, that I have ever attempted to bake bread. I did it all completely from scratch.
Here are my ingredients:
- 6 cups bread flour
- 1/3 cup sugar
- 1 packet of active dry yeast
- 1 tablespoon of salt
- 1/2 cup canola oil
- 1 cup potato starter (see previous blog for recipe)
- 1 and 1/2 cups warm to hot water (120-130 degrees)
Step 1) First I combined the first 4 ingredients into a large mixing bowl
 |
| Flour |
 |
| Sugar |
 |
| Mixing All Dry Ingredients |
Step 2) Next I gradually added oil, potato starter, and water and mix together by hand
 |
| Oil |
 |
| Starter (Patty) |
To give you a little background on my Patty (my starter), you should know I didn't feed Patty for 21 days. Basically if you take a look at my last blog, I was supposed to feed her 2 days after and just never got around to it. After a few days I stuck her in the fridge and then just hoped she would work for the bread making. She worked fine, so I wouldn't worry about it. My boyfriend says as long as Patty stays in the fridge she could live without being fed for awhile. My boyfriend and I both used her to bake bread so there wasn't much left of her after baking. I divided her into two strains and so I could have more of her in storage.
 |
| Hand Mixing wet ingredients |
Step 3) You are supposed to flour the counter and kneaded the dough lightly 4-5 times. I on the other hand did not do this. I didn't read that part of the directions and sort of kneaded it like 10 times.
Step 4) I added a little oil to the bowl and and turned the dough over so its covered in grease. After, I covered it loosely with plastic wrap and let it rise for 8 hours (maybe while you're at work). I started this process around 8pm and so I let it rise until about 8am. Thats quite a bit of time.
 |
| 8pm Saturday Night |
 |
| 8am Sunday Morning |
Step 5) In the morning I threw some flour down on the counter and dumped the dough out of the bowl.
Step 6) I watched a youtube video on how to make bread loaves. Basically I just took a butter knife and cut the dough in half and then kind of took each side and tucked it under it sealing it and then at the same time trying to get the shape you're going for. I'd recommend watching a video on it as its hard to explain. It was at this moment I realized I didn't have bread pans.
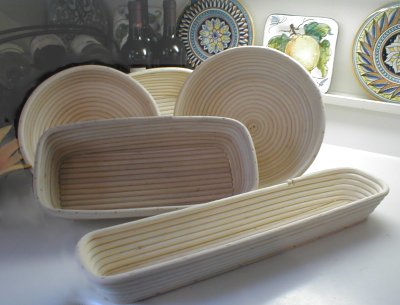
I knew that the bread was going to continue to rise for a few more hours but didn't want the bread to turn into a huge cake glob. Ideally you would have something called a Brotform which is basically a basket you put the bread it while it rises.
 |
| This is what Brotforms look like |
It was at that point I decided to make my own.
Step 7) I placed plastic mugs inside of large baking pans and then lines them with foil. I then added some flour to the bottom. This is where the rolls will rise again for a few hours
Step 8) After this, I had to run to a brunch. So I told Dan when we woke up to throw them in the oven. You can see in the picture below how big these bad boys expanded to be. He took out the plastic cups and stuck them in the oven for 25 minutes.
 |
| One of the bread rolls shortly after being placed in the oven |
 |
| Both bread rolls side by side and Dan's little rolls up top | | | | | |
|
|
|
|
|
|
|
|
|
|
|
|
Step 9) Take the bread out of the oven and enjoy! I have been keeping it wrapped up in plastic wrap to stay fresh. It only lasted about a day though before it was all eaten.
 |
| Both bread rolls fresh out of the oven |
|
 |
| Slices Bread! Yummy. |