Tuesday, August 20, 2013

Baking Potato Sourdough Bread -- Day 21


This is the first time ever in my whole life, that I have ever attempted to bake bread. I did it all completely from scratch.

Here are my ingredients:

  • 6 cups bread flour
  • 1/3 cup sugar
  • 1 packet of active dry yeast
  • 1 tablespoon of salt
  • 1/2 cup canola oil 
  • 1 cup potato starter (see previous blog for recipe)
  • 1 and 1/2 cups warm to hot water (120-130 degrees)


Step 1)  First I combined the first 4 ingredients into a large mixing bowl
Flour

Sugar

Mixing All Dry Ingredients
Step 2) Next I gradually added oil, potato starter, and water and mix together by hand
Oil
 Starter (Patty)
 To give you a little background on my Patty (my starter), you should know I didn't feed Patty for 21 days. Basically if you take a look at my last blog, I was supposed to feed her 2 days after and just never got around to it. After a few days I stuck her in the fridge and then just hoped she would work for the bread making. She worked fine, so I wouldn't worry about it. My boyfriend says as long as Patty stays in the fridge she could live without being fed for awhile. My boyfriend and I both used her to bake bread so there wasn't much left of her after baking. I divided her into two strains and so I could have more of her in storage.
Hand Mixing wet ingredients
Step 3) You are supposed to flour the counter and  kneaded the dough lightly 4-5 times. I on the other hand did not do this. I didn't read that part of the directions and sort of kneaded it like 10 times. 

Step 4) I added a little oil to the bowl and and turned the dough over so its covered in grease. After, I covered it loosely with plastic wrap and let it rise for 8 hours (maybe while you're at work). I started this process around 8pm and so I let it rise until about 8am. Thats quite a bit of time.
8pm Saturday Night
8am Sunday Morning
Step 5) In the morning I threw some flour down on the counter and dumped the dough out of the bowl.


Step 6) I watched a youtube video on how to make bread loaves. Basically I just took a butter knife and cut the dough in half and then kind of took each side and tucked it under it sealing it and then at the same time trying to get the shape you're going for. I'd recommend watching a video on it as its hard to explain. It was at this moment I realized I didn't have bread pans. 


I knew that the bread was going to continue to rise for a few more hours but didn't want the bread to turn into a huge cake glob. Ideally you would have something called a Brotform which is basically a basket you put the bread it while it rises.
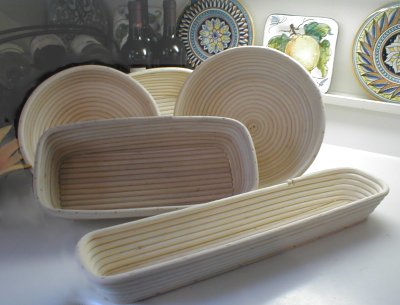
This is what Brotforms look like

 It was at that point I decided to make my own. 

Step 7) I placed plastic mugs inside of large baking pans and then lines them with foil. I then added some flour to the bottom. This is where the rolls will rise again for a few hours


 Step 8)  After this, I had to run to a brunch. So I told Dan when we woke up to throw them in the oven. You can see in the picture below how big these bad boys expanded to be. He took out the plastic cups and stuck them in the oven for 25 minutes.
One of the bread rolls shortly after being placed in the oven
Both bread rolls side by side and Dan's little rolls up top


Step 9) Take the bread out of the oven and enjoy! I have been keeping it wrapped up in plastic wrap to stay fresh. It only lasted about a day though before it was all eaten.

Both bread rolls fresh out of the oven

Slices Bread! Yummy.


Thursday, July 25, 2013

This is how it all starts -- Potato Sourdough Day 1

Thanks to Bradford's mom i'm trying out a sourdough recipe. (Thanks Mrs. Church!) My motivation comes from all the envious days at lunch when I saw Bradford eating that delicious smelling bread. Hopefully those days are over!

Potato Sourdough Starter Ingredients

  • ½ to ¾ cup sugar (I did a half cup and scooped back for a dab more)
  • 3 tablespoons instant potato flakes
  • 1 package active dry yeast
  • 1 cup warm/hot water (120 to 130 degrees) (I didn't know what this meant, so I just ran the hot water from the tap for a little bit and figured that should be a good enough temperature)

1) I started out with a regular jar that used to hold HOT salsa in it. Hopefully this doesn't confuse anyone too much.


2) I threw the sugar, potato flakes and yeast into the jar
 3) Poured in a cup of water (remember just hot from the tap, you could still touch it)

4) Now this is where my steps become a little shady. To be honest with you, I mixed with a metal spoon. I know we're not supposed to! After saying "OH CRAP" I began mixing with a wooden spoon as depicted here. I may be rolling dice on this move, but we'll see how it plays out.

5) This is what the final product looks like mixed. Afterwards I secured the lid and walked away. 


6) After about 30 minutes and with talking to my boyfriend (who by the way deals a lot with yeast since he brews beer), I decided to loosen the seal on the cap because of the CO2 buildup. I didn't want to risk glass exploding. In addition, as you can see here, there contents started to separate into two forms. 

6) I just stirred it again finally with a wooden spoon this time. I named my starter "Patty" because shes made from potatoes and I thought that made sense. Fitting right? Am I right?!. Hang in there Patty, i'm here for you.


Thursday, May 16, 2013

Gluten Free Chocolate Brownies with Heath Bar Toffee Caramel Filling

These brownies were a huge hit. I have made them twice in a row now. This batch makes around 15-20 small brownies which is good for about 10-12 people having a couple each. If you want them to last awhile or people to have larger brownies, double the batch and use 2 pans.


Ingredients:
  • 1 package of Devil's Food Cake
  • 1 stick of butter (softened, not melted)
  • 1 egg
  • 1 can of condensed milk (12 oz)
  • 1 package of heath bar toffee bits
  • 1 package of chocolate chips


Step 1: Mix cake mix, stick of butter, 1/2 can of milk and egg in a bowl.
Brownie batter for the 1st layer

This will have a really thick consistency.

Step 2: Spread 2/3 of batter in into a 13 x 9 baking sheet. Bake at 350 degrees for 8 minutes. After 8 minutes take out to set on the counter. It should be baked around the edges and still look uncooked in the center.

Step 3: In a small pot, combine and heat the rest of the condense milk and full bag of toffee bits, until melted. This may have a few chunks left in it but thats okay as long as it has mostly a caramel consistency. Do this on low to medium heat. Stir constantly making sure that its not burning or stick the bottom of the pan at all.

Step 4: Spread 1/4 of bag of chocolate chips of the brownie batter. Next, add an even layer of caramel topping, using all of the caramel. After this, drop the rest of the brownie better in small chunks to try to create as close to another even layer of batter. 

Step 4: After the layers are spread evenly. Place into the oven for about 25-30 minutes checking after 20 minutes. Check with a tooth pick to see that it comes out cleanly. If the 80% of the pain comes out cleanly with the toothpick, it is done. Place on the counter and let it cool in the pain, it will continue to cook a little for that last 20%.


Step 5: If you plan on heating a hot brownie with a scoop of ice cream, go ahead and scoop out that bad boy while its hot into your ice cream bowl. If you are repacking to give out, wait until they are completely cooled. Since they are a little crumbly, wrap them in saran wrap to give them shape and they should maintain that when people unwrap them. I like to store them in clear plastic bags so they can stay air tight and fresh.